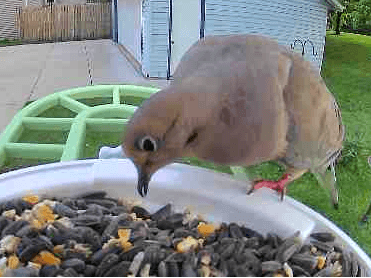
Recently I was gifted a very nice feeder camera from a relative who had had it gifted to her but wasn’t allowed by her HOA to use it.
Sad.
The camera is made by a company that mostly makes home security products, so I think the quality of the camera itself should be quite good.
Initial Camera Setup
The camera package came with a rather barebones manual, but it was complete enough to get the camera working - though I did have to figure out a few things on my own that the manual didn’t mention.
The manual seems to have been originally for a different model, or else they changed the model of the camera I got. I know this because there’s a sticker over the original model number on the front cover. There’s also a sticker inside that upgrades “USB” to “Type-c USB”.
There’s an app (of course) that I had to download. I used the QR code provided to find it. The app is well-designed and works as intended. I did have to upgrade the firmware of the camera, as mentioned in the manual.
I connected the camera to my personal wifi but not at the 5G level. The manual tells you not to use 5G because the 2.4G version has stronger wall penetration.
After connecting the camera to the wifi, the camera said (in a female voice), “Connection succeeded.”
That was a bit of a shock.
I also discovered that, if I allow the app to access my phone’s microphone, I can speak through that same speaker on the camera. I guess this could be used to scare non-bird critters away if needed.
Actually, I suspect this is really just a carryover from the home security aspect of the camera. If you had this camera installed at your front door, you’d be able to talk to whoever is standing outside without opening the door.
The camera is, of course, motion sensitive, so as it was sitting on the dining room table before being mounted in the backyard, it would send me a notification anytime someone happened to cross its path. It took a still shot and recorded 10 seconds of video to the included 30GB SD card. Eventually I figured out there’s a “sleep” setting in the app that essentially turns the camera off.
Camera Installation
While you can install the camera onto an outer wall - like the side of a garage - that wouldn’t really work in my situation. So I had to buy a 4x4 post and an appropriate squirrel baffle.
The post did fit into the cabin of my car, but only just. The real trick was getting it into the ground. Research suggested that I dig a 34-inch hole. That requires quite a bit of effort when you don’t have a post hole digger - only a standard spade and small hand tools.
I picked a spot in the backyard where the solar panels in the roof of the feeder would get maximum sunlight day in and day out. Fortunately, that spot didn’t have any large rocks in the immediate vicinity.
I made it down to about 30 inches and stopped for a couple of reasons. One, it was getting really hard to remove the dirt that I was loosening. And two, my spade really couldn’t loosen much more dirt in the ~10-inch hole I had made.
I realized later that, since only about half the dirt would fit back into the hole, I could use the extra to build a mound around the post and, in effect, have about 34 inches of wood covered with dirt.
An 8-foot 4x4 is heavy. It’s a two-person job to insert it into the hole in the ground and backfill with small rocks (which I also had to buy) and dirt. I added a layer of rocks at the bottom first, then my wife and I lowered the post into the hole. She held it while I added dirt and used a level to make sure the post was as vertical as it could be.
I had to tamp down the dirt so the pole wouldn’t move later. It turns out that the handle end of a spade works well for this operation. So, while my wife held the pole steady, I tamped the first layer of soil all around it. Then I alternated adding two more layers of rocks and soil until the hole was about half full, tamping each soil layer. The post was then solidly in place, so my wife could be excused from the project.
After finishing the backfilling, as I mentioned earlier, I used most of the remaining dirt to make a mound around the base of the post.
It won’t be going anywhere anytime soon.
Then I decided to stain it with some chocolate-colored stain I had left over from an earlier project this summer. After adding a quick coat with a previously-used brush that wasn’t solid as a rock yet, I let it dry a bit before drilling holes for the mounting bracket.
The package nicely included a drilling template sticker, which I pasted near the top of the post. After drilling, I used the nice, small screwdriver they included to turn in the 2 long screws.
I mounted the bracket, made sure it was level, and tightened the screws.
I had to attach the roof to the base of the feeder, screw the antenna onto the back, mount the assembly onto the bracket (using hardware provided), flip up the roof, fill the feeder with food, snap the roof back into place, and “wake up” the camera via the app. Done.
First Visitor
Then I just had to wait for the birds to discover it. That didn’t take long. A Mourning Dove was the first visitor.
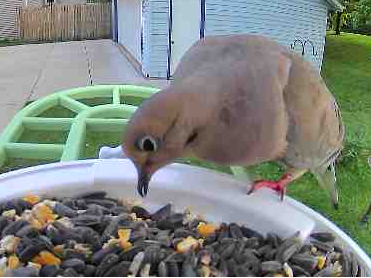
I am now getting dozens of still shots of birds eating food on the platform.
Hurray!
At first, 10-second videos were being recorded to the SD card. However, after I reformatted it to erase videos I didn’t want, the card stopped accepting or the camera stopped recording or both.
Disappointing.
I have a ticket open with the company about the problem. I’ll try to remember to update this article if the problem gets resolved.
So the total installation from unpacking to making purchases to final setup probably took a whole day when you add it all together. (Having a post hole digger may have shortened that significantly.)
As of this writing, I haven’t received the baffle I ordered yet. Somewhat surprisingly, the squirrels haven’t attempted to climb the post yet.
So far, it’s been totally worth the time and effort. If you ever have the opportunity to add a quality feeder camera to your backyard, go for it.